
Product photography: how to shoot shiny or reflective candle containers
Tips for highlighting the brilliance of your iridescent, shimmery, and electroplated candles!
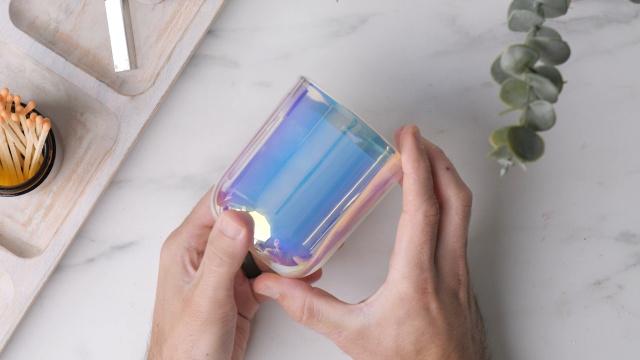
Many glass containers are reflective, which can make photographing your products tricky! But shiny containers like our Prism Sonoma Tumbler Jar, Iridescent Tumbler Jars, and electroplated and mercury glass tumbler jars can pose additional challenges thanks to their exceptional luster and color-shifting qualities.
So today, we’re exploring ways to approach photographing shiny candle jars and products with considerations for capturing colors, as well as navigating glare and reflections.
This is the fourth installment in our candle product photography series. If you’re new to the series, we recommend familiarizing yourself with the beginner-friendly advice on natural light photography, focusing and composing your shot, and photo backdrops and surfaces. Understanding these fundamentals will help you dive into today’s topic, which builds on concepts explained in those previous articles.
Understanding the challenges
The primary challenges when photographing shiny candle containers are accurately depicting colors and minimizing glare.
The surfaces of these containers can easily pick up glare and reflections from the surrounding environment, potentially distorting the true colors of the containers in photographs. For instance, our in-house photographers found that large glare spots and color changes were common when shooting the Prism Sonomas and the Mini Prisms. Meanwhile, glare was the main challenge when photographing electroplated, mercury glass, and iridescent jars.
When photographing reflective products, it's crucial to pay attention to what appears within the camera frame. But the immediate surroundings can also influence the final image’s appearance, so be sure to:
- Turn off overhead light fixtures or lamps for better control of the light.
- Notice any colors in the environment that may cast a hue onto the product you’re shooting. This includes wall colors, your own clothing, and window coverings.
- Strategically place props in the photo and be mindful of how they might be reflected on the container’s surface.
How background colors impact product appearance
The choice of background color can significantly change the overall look of your shiny candle containers. Dark backgrounds absorb light, which can lead to a striking contrast with a container’s surface or help tone down glare. On the other hand, white or very light backgrounds reflect light and can result in brighter images—but also may amplify glare.
To illustrate this point, consider how different the Prism Sonoma Jar appears when photographed against two different background colors. Both images were shot under the same lighting conditions, using the same jar.
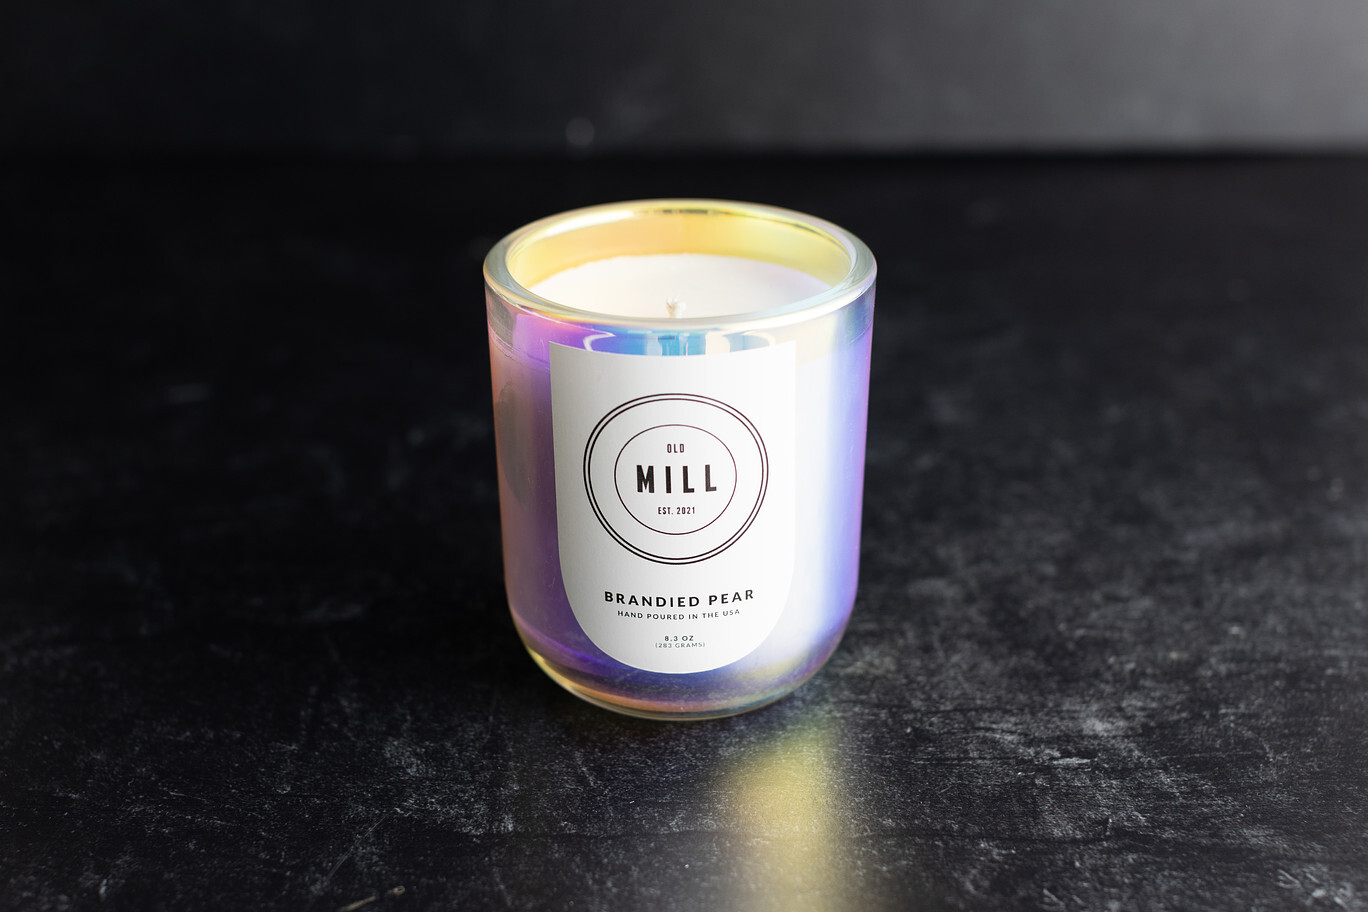
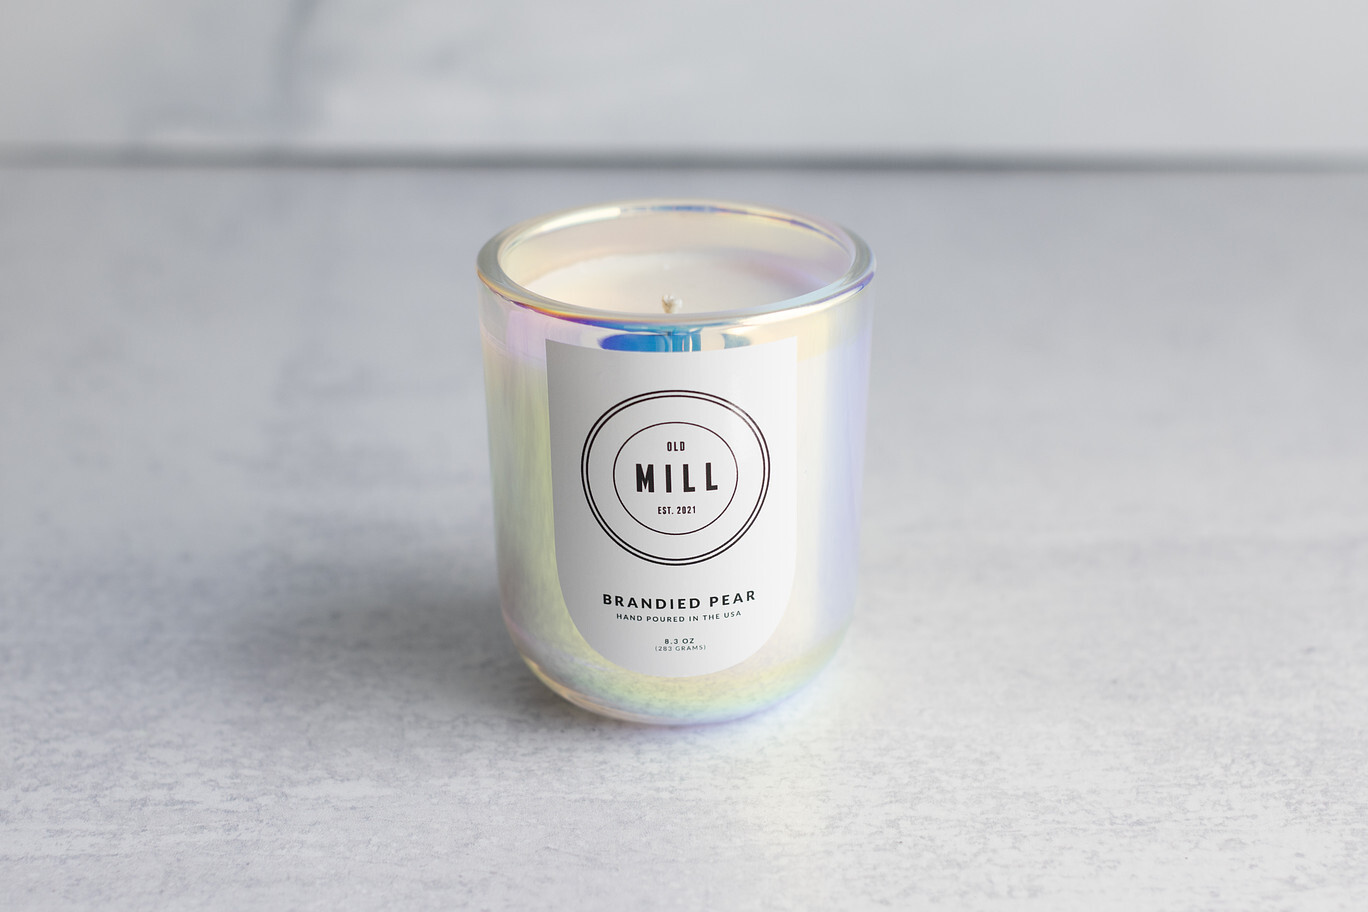
Most noticeably, the container appears to be two totally different colors! On the black background, the purples and blues are dominant and the glare appears fairly subdued. Against the white backdrop, the jar looks pearlescent in color and generally more luminous. This demonstrates just how much influence the background can have!
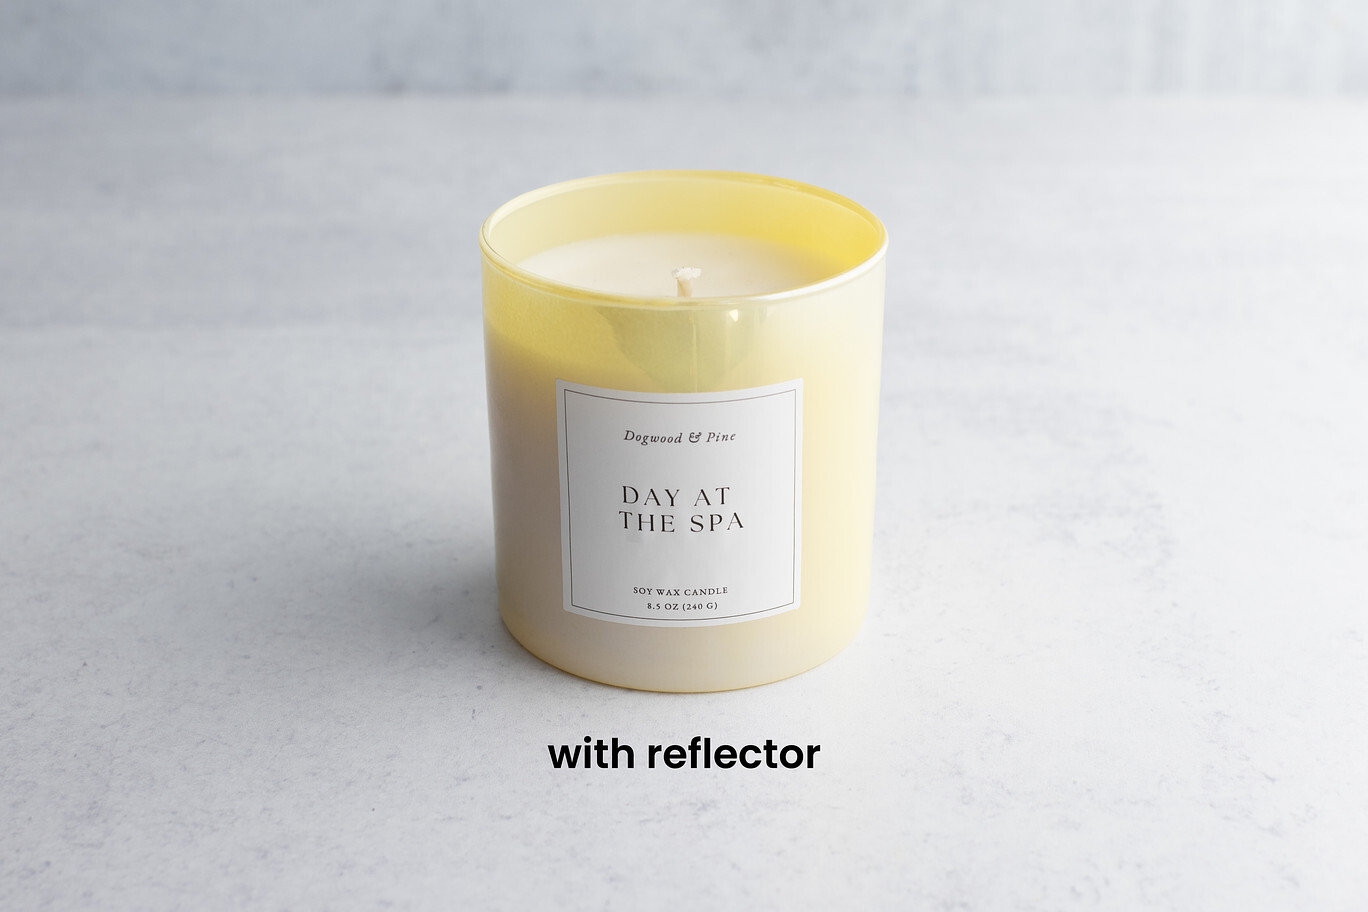
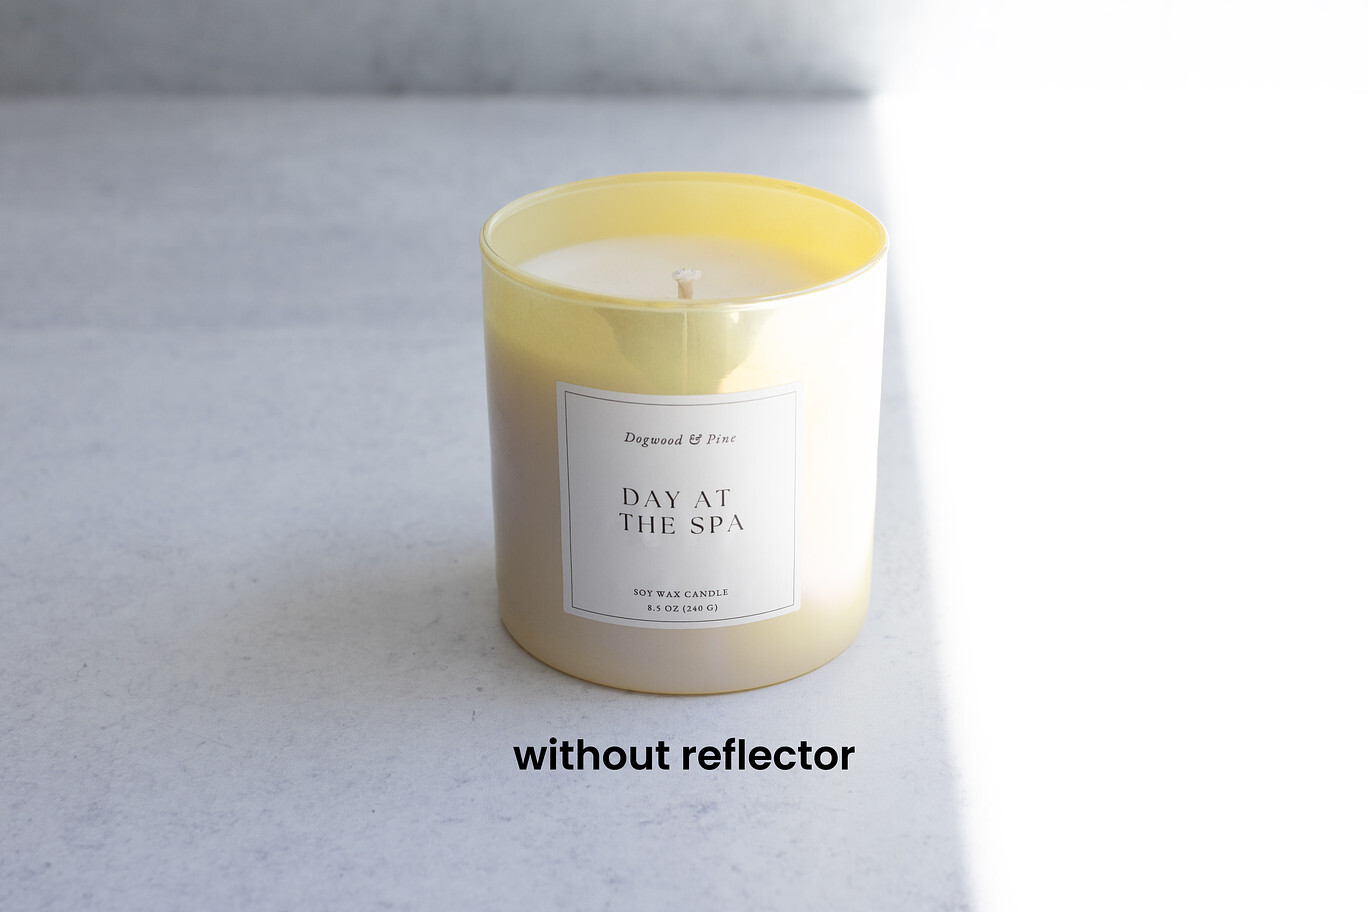
Setting the scene: lighting your shot
In addition to the backdrops you use, how you light your shots greatly affects the images.
If your goal is to create photos that show accurate colors and minimal glare, diffused (or indirect) lighting is key to accomplishing this. When using natural light, you can achieve a diffused effect by shooting on a cloudy day, in a shaded area, or by a window covered with a white curtain.
If you use artificial or studio lighting, putting a large diffuser over the light source will help spread the light softly and reduce harsh reflections.
Regardless of the light source, a reflector can also help to evenly distribute the light in your image and create a truer-to-life depiction of your candle.
However, if you're aiming for a more dramatic look with pronounced shadows or reflections, don't shy away from experimenting with direct light and lighting setups to achieve the desired effect.
Use video to showcase your shiny candles! Video is another way to capture the mesmerizing shift in a container’s appearance as light and angles change—something static images struggle to do. Plus, short videos are a growing trend in e-commerce because they help shoppers feel confident about their purchase with a clearer view of the product.
Tailoring your approach for picture-perfect results
When it comes to shiny candle container photography, there's no one-size-fits-all approach. Your technical choices will be driven by the desired aesthetic goals for the final images.
For photos that accurately represent the containers, prioritize diffused lighting and minimal glare. Looking for a more artistic or avant-garde image? Play with lighting setups and background choices to achieve the creative vibe you seek.
Just remember, the ultimate goal is to capture images that show off the beauty and allure of your shiny candle containers. Compelling visuals will make customers eager to click "add to cart" and experience the magic of your creations for themselves.
If you've applied these techniques to your shiny candle container photography, we'd love to see your results! Share your images with the CandleScience community by tagging us @CandleScience and using the #CandleScientist hashtag on social media.
If you’re interested in more candle business content, be sure to check out our Business Guides. You’ll find in-depth articles on topics like selling wholesale to stores, at markets, and on consignment. Plus get helpful ideas for social media posts, taking product photos with natural light, saving time in your business, and more!